Welcome to our website !
I love baking cookies...but not so much in eating them. Chinese New Year is just about the only time of the year when I actually enjoy both baking and eating them ;)

The first runner up on my cookies-making marathon is none other than these Pineapple Tarts.


I have a love-hate relationship with these Chinese New Year must-haves. Only those who have made them from scratch, all done single-handedly, from cutting the pineapples to washing up, to eventually packed these priceless morsels into containers will fully understand what I mean. Ok, I didn't do every single bit by myself, my not-so-reliable kitchen assistant did stop by to help me with the final touches just minutes before the cookies went into the oven ;)


I was almost half-dead after making the pineapple jam, not forgetting the minor cuts on my fingers as a result of being over zealous when grating the pineapples! It took me about 45mins to an hour to cook the jam. The time taken would have been longer, but I stopped when the jam 'appeared' to be fully dried up. Actually the jam was quite soft...it would be better to continue to cook it longer, but I worried I would burnt the whole pot of jam. I rather work with soft jam than to jeopardise a whole afternoon's hard work!


After spending 2 hours working non-stop, I completed two trays of pineapple tarts, just a mere 40 tangerine style ones and 30 open tarts. I actually suffered from a bad headache after making them...and had to resort to panadol and a medicated rub on my shoulders before I crept into bed that night. If you were to ask me now, I will tell you, No, I am not going to make them again, never! I have already developed a pineapple tarts phobia!


I told my cyberfriend VB, if she ever wants to make these, do make them only for herself, or only give them to someone who has baking experience or at least someone who has made cookies from scratch. I believe they are the ones who are able to appreciate your labour of love. Seriously, when it comes to pineapple tarts, everyone has got their own preferences...some prefers melt in the mouth texture, some prefers the jam fibre to be coarse, not too sweet not too sour...some even asking for pastries that could hold up nicely that doesn't crumble in your hands but only in your mouth, blah, blah, blah. It is too difficult to please each and everyone's taste buds. I don't know about you, I will be very very moody, if I hear the slightest, undesired comments about the pineapple tarts I made...


I am lucky that I found a cake friend, she is the first person whom I have this "相逢恨晚" feelings (loosely translated as...it's a regret that we met each other so late). These pineapple tarts are made especially for her as I suspected she doesn't make them, at least, she has never mentioned it to me.  I have wanted to tell her, only tell me if the pineapple tarts are nice, even if it doesn't suit her taste, I don't mind a white lie ;) But as usual, I forget about it when we started to engage in a hot topic...that is, about our kids' academic studies!


Anyway, I don't know whether it was a white lie, but my friend came back with good comments. It was certainly a pleasure to hear that she was able to mention things like..."there is no buttery aftertaste...did you use Lurpak? and I thought I tasted vanilla, did you add vanilla extract?" Even though I felt sheepish when she mentioned that she tasted some pineapple fibres, but she said it gets to show that everything is homemade from scratch (^^'). I guess for all homebakers, especially self taught ones, these are sincere comments that we treasure, it is through sharing that we would be able to improve our baking skills.

I hope you have also found yourself a cake friend, someone who can share your bakes and experience with each other :)


Pineapple Tarts

Pineapple Jam:
Ingredients:
(yields about 450g jam)

2 half ripened pineapples (use Sarawak pineapples)
250g granulated sugar (use between 200g to 300g, adjust according to taste)
1 cinnamons stick (about 5cm)
4 cloves

Method:

  1. Remove the skin on the pineapples (choose half ripened ones as fully ripened pineapples will be difficult to grate and unripe ones will be too sour). Cut away the 'eyes'. Cut the pineapples (lengthwise) into 4 quarters. Grate the pineapples.
  2. Drain the grated pineapples, press out the juice with the back of a spoon. Reserve the pineapple juice.
  3. Place grated pineapples, cinnamon stick, cloves, and half the amount of sugar in a pot (I used a stainless steel pot with a heavy base). Bring to a boil. Turn to medium heat and let it continue to simmer. Stir occasionally. When the mixture starts to dry up, add in a few tablespoons of the reserved pineapple juice. Continue to let it simmer. Keep adding the pineapple juice as the mixture dries up. Continue till all the pineapple juice is used up.
  4. Add in the remaining sugar gradually (a few tablespoons at a time), and keep stirring as the mixture dries up. Adjust amount of sugar according to taste.
  5. Turn to LOW heat, keep stirring the mixture until the jam caramelised, becomes sticky and dry. Total cooking time is about 1 hour or longer. Leave to cool and place in air tight container and store in fridge. 
  6. When ready, roll pineapple jam into 6g balls (about 1 teaspoon). Store covered in fridge until ready to use. 


Pastry:
Ingredients:
(portion is enough to make 70 tarts)

8oz (227g) Unsalted butter, cut into chunks, soften at room temperature
50g icing sugar
2 egg yolks, lightly beaten
1 teaspoon vanilla extract (I used Nielsen-Massey pure vanilla extract)
14oz (396g) plain flour
1/2 teaspoon salt


Method:
  1. Place butter (I used unsalted Lurpak)  in a mixing bowl. Sift over the icing sugar. With an electric mixer, on medium speed, cream butter and icing sugar till the mixture turns pale. Add in salt, whisk to combine.
  2. Add in the vanilla extract and whisk to combine.
  3. Dribble in the egg yolks and continue to whisk the mixture till fully incorporated.
  4. Sift flour into the mixture. Mix the mixture with your hand and lightly knead for a couple of minutes till the flour is incorporated into the dough (do not over work the dough).
  5. Wrap the dough with cling wrap and chill in the fridge for about 30mins. (This will prevent the dough from spreading upon baking, and also makes it easier to handle.)
  6. For Tangerine style: Divide dough into 10g each. Flatten each dough into a small disc and wrap with a pineapple jam. Top with a clove. Place on baking tray lined with parchment paper. (Note: If the jam is too soft, it will be difficult to wrap. To overcome this problem, freeze the rolled jam balls in the freezer for about 30mins, or longer, before wrapping. Watch this video to learn the method to wrap the tarts.)
  7. For Open tarts: Roll out a portion of the dough (it is easier to work in smaller portions) between two plastic sheets to about 5~7mm thick. (The plastic sheets help to prevent dough from sticking to the rolling pin and work surface.) Cut out the dough with the tart mould and transfer to baking tray, lined with parchment paper. (To get very clear imprints, place both the outer ring and the inner piece of the mould on the roll out dough. Press the outer ring into the dough then push down the inner piece with some force. Lift up the mould and carefully remove the cut out dough which is stuck to the mould. Dust the mould with flour regularly for easy release.) Place pineapple jam balls on each cut out dough. To decorate, top it with a tiny ball of dough or cut out thin strips of dough and lay over the top of the pineapple paste. (Note: I omit the egg wash for both tangerine style and open tarts.)
  8. Bake in preheated oven at 170 degC for 15 mins. Leave to cool on baking tray for a few minutes before transferring to wire rack. Let cool before storing in air-tight containers.
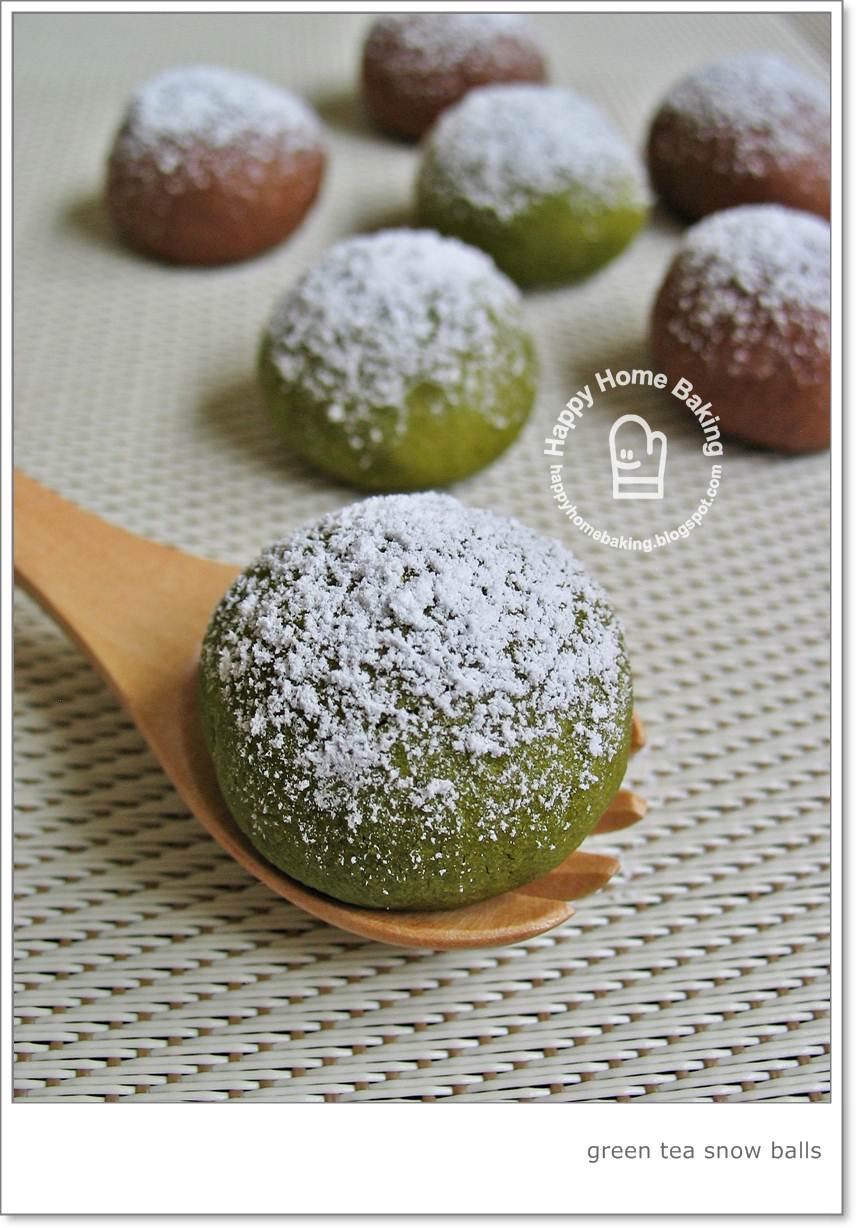
It is the time of the year again when I will go on a cookie baking frenzy!


I kicked start my Chinese New Year cookie baking marathon with a batch of green tea snowballs. Upon my cyberfriend, VB's recommendation (see her lovely creation here), I first attempted to make these snowball cookies following the recipe from Daily Delicious, one of my favourite food bloggers.

Before I actually made them, I causally mentioned it to my cake friend that I am planning to make some snowballs...just the name itself got her interested. I didn't even show her the link to the recipe, as my intention was to share baking tips with her only after I have tested it out. Yet she was inspired enough to google for the recipe ;)  She came back to inform me that she has found two similar recipes, one from Daily Delicious (who can miss her gorgeous Little Balls of Happiness?!) and one posted by Wendy of My Buttery Fingers. The main difference between the two recipes is, one uses egg white while the other doesn't. My cake friend decided to try out Wendy's recipe, just like me, she doesn't know what to do with a left over egg yolk. It was great news to me, as I could hear her reviews before deciding which recipe to go for. I suggested to her that may be she could add a pinch of baking powder since Wendy mentioned that her cookies flattened a little upon baking. Well, it seems that the baking powder didn't make much of a difference after all...


My attempt with Daily Delicious green tea snowballs was not an instant success. No, there is nothing wrong with the recipe, the only thing I did wrong was that I didn't keep a close watch over the cookies while they were baking in the oven. It turns out that my oven was too hot (I used the fan mode), and the cookies were overly browned even before the baking time was up :'(

I have actually planned to bake them for my friends, luckily it was a test batch!

So, back to the drawing board again...I struggled between going back to the same recipe and the one from My Buttery Fingers. In the end, I decided to try out Wendy's recipe as I don't want to have any left over egg yolk again. With the experience from the first batch of snowballs, I was diligent enough to keep a close guard while the cookies were baking...no more over browning, yeah!


Taste wise, both cookies are almost similar, but since more green tea powder is used in Wendy's recipe, the green tea fragrant is more prominent. The fragrance from the almond powder is another bonus! The chocolate version tastes good too, the extra icing sugar makes them less bitter since I used unsweetened cocoa powder. As for the texture, both doesn't melt in the mouth...rather they are in between crunchy and melt in the mouth. The cookies made with Wendy's recipe are softer, probably because there is no egg white used. If you were to ask me, both are good recipes, but I would stick to Wendy's recipe simply because it calls for less ingredients.


Besides the snowballs cookies, I have also made marbled Melt-in-the mouth German Cookies for my friends...whom I've known for the past 15~19 years.

My cookies were all packed inside these lovely milk cartoon gift boxes which I happened to chance upon them at a neighbourhood gift shop...


Of course, the cookies I made have a very short shelf life...but I believe our friendship does not come with an expiry date. I do hope my friends will like the cookies as much as I enjoy making them, for them :)


Green Tea and Chocolate Snowballs
(抹茶,可可雪球)


Ingredients:
(makes 35)

90g Unsalted butter, cut into cubes, soften at room temperature
a pinch of salt
30g icing sugar
50g ground almonds (almond powder)
100g cake flour
6g green tea/matcha powder
10g cocoa powder (I used unsweetened, Ghirardelli)

extra icing sugar, for dusting

Method:

  1. Toast almond powder at 100 degC for 10 mins. Stirring in between. Let cool completely before using.
  2. Place butter, salt in a mixing bowl. Sift over the icing sugar (do not skip this step, this is to remove any lumps in the icing sugar). With a manual whisk or a wooden spoon (or an electric whisk), beat the butter, salt and icing sugar till the mixture turns pale.
  3. Add almond powder, whisk to combine.
  4. Sift over the cake flour. With a spatula, fold the mixture until just combined.
  5. Divide the dough into two portions (about 125g per portion). Mix green tea powder into one portion, and cocoa powder into the other portion. (Note the dough will be quite soft and sticky.)
  6. Wrap the two doughs separately with cling wrap and leave to chill in the fridge for about 30 minutes. (Note: if left to chill for a longer time, the dough will turn hard. Leave it at room temperature for about 5~10mins to soften before working on it.)
  7. Working with one portion of the dough at a time, measure 8g of dough and shape into balls. Place shaped doughs evenly spaced on baking tray lined with parchment paper, avoid the edges  of the tray as they tend to brown too quickly. These cookies do not expand much upon baking. (Note: the dough soften easily especially in warm and humid weather, so work as quickly as possible. If there is space available, leave the tray of shaped balls to chill in the fridge before proceeding with the other portion. This is to help prevent the shaped doughs from flattening too much upon baking.)
  8. Repeat the same with the second portion of the dough.
  9. Bake in preheated oven at 170degC for about 20-25 minutes until lightly browned. (Note: all ovens behave differently, do keep a close watch near 15mins of baking time to prevent the cookies from over browning. Turn the tray around half way, when necessary. If your oven only allows baking one tray at a time, leave the other tray of shaped doughs in the fridge, or only start working with the second portion while the first tray is baking in the oven. This is to help prevent the shaped doughs from flattening too much upon baking.)
  10. Remove from oven. Let cool for a couple of minutes in the tray before transferring to a cooling rack. While the cookies are still warm, dust them with icing sugar. When thoroughly cool, dust again with icing sugar. (alternatively, leave the cookies to cool completely, coat the surface with icing sugar.) Store in air tight container.
Recipe Source: My Buttery Fingers
It's that time of the year when I will reflect on what I've accomplished in my little world of baking and blogging, and, to wish my blog, a belated, blog anniversary!

It has been five years since I pen my very first blog post here. Since then, the number of posts per year has declined drastically...from a whopping 128 posts on the first year (I can't believe I was writing more than two posts a week back then), down to not more than 70 posts for the following years. Sad to say, I couldn't even make it to one post per week in 2011. My initial passion to blog about every single thing has long gone and the period between updates drags from days to weeks.  At the rate I am going, I wonder whether I am able to hit 30 posts by end of this year?

I still love baking. There are many recipes out there that I would like to explore. But, putting together a blog post goes beyond mixing ingredients and putting batter into oven. I am usually lost for words when it comes to the actual writing. Of course it is easy to write a post, but to be able to write a great post, with content and be able to engage the reader is something I have to struggle with every time I am on the 'draft' mode. Besides, I am probably too boring a person to be able to put up an interesting post every other day.

Nevertheless, I am proud of myself that I didn't deviate too much from the main aim of starting this blog five years ago...

"By starting this blog, I hope I am able to get ideas and suggestions from fellow home bakers to improve my baking skills. At the same time I hope my creations and little experiments would also inspire others, who are like me, to start baking as a hobby. "

I started off year 2011 with great inspirations...with the good intention of walking down my baking trail once again. Just like any other new year resolutions, I didn't accomplish much (^^'). Neither did I venture further from the simple bakes...it was always the usual muffins, cookies and easy cakes. But I did attempt to try making traditional kuihs and local desserts, such as ondeh ondeh and tau suan. I hope I deserve a pat on the shoulder for that ;)

Here's a recollection of some of my favourite bakes and desserts for the past year...

Old Fashioned Banana Cake

Matcha Chiffon Cake

Melt-in-mouth German Cookies

Classic Chocolate Cake

Pandan Chiffon Cake

Apple Tart

Tau Suan

Traditional Mooncakes

Muah Chee

Cinnamon Rolls

Sweet Potato Ondeh Ondeh

Cranberries Scones

If you are interested in any one of them, just click on the images for the recipes.

I won't be making any new year resolutions...all I wish for is, this time next year, I am able to recollect more good memories than the past year.

Here's wishing all of you, a fruitful and prosperous year ahead!

Warm, buttery scones are such a delight to wake up to, especially on a Sunday morning.

The problem with baking away from home is, I could only stick to very simple bakes that require minimal use of baking equipments or tools. Baking up a batch of scones is probably the simplest way to stop my itch for baking. They can be put together without using a whisk nor a spatula.


It was one of those rare occasion when I felt really proud of myself when I took out this tray of towering high scones from the oven.


Look at how tall these scones have rose from a mere 1 inch thick rounds. They have doubled their height after spending not more than 15mins in the oven. These are the tallest scones I have ever made! Thanks to a recipe that I came across not too long ago. The trick for yielding towering high scones lie in 'folding' the dough a few times...almost the same concept as making the pastry dough for croissants. I have came across similar recipes that call for rolling out the dough and making 'envelop' folds and repeating it a few times. However, I was a little skeptical as I have came across too many scone recipes that often warn you not to over work the dough. This recipe that I followed recommends a slightly different method of doing the folds. Instead of rolling the dough out with a rolling pin, the dough is gently pat down lightly before it is cut into halve. Then, one half is stacked over on the other before the stacked dough is pat down again. The process is then repeated a couple of times. I am all for this method as I am confident that I wouldn't over handle the dough too much.


I bought this lovely cookie cutter from a tiny baking supply shop in Sanlitun (三里屯). My children and I were walking towards the bus station after a light lunch at Sanlitun village when I spotted the signage of this shop from a distance. I didn't even notice its existence when I passed by the same lane, twice. There are only three display racks inside the shop, yet I managed to buy 2 cookie cutters, some cocoa power, cake flour, dried cranberries and even birthday candles ;)

I used this cutter to cut out the scones since it is the same size as recommended in the recipe. As expected, the scones didn't retain the flower shape after baking...but the height of the scones more than compensated for the lack of visual appeal.


I actually felt half-hearted when I started working on the dough, which was dry compared to the sticky and softer doughs that I am more familiar with. I was expecting a total failure and I felt like kicking myself for replacing fresh strawberries, as called for in the original recipe, with dried cranberries. However, much to my delight, the scones turned out wonderfully light and fluffy, and very tall! These freshly baked scones were so delicious that they were good even on their own. All I needed was just a cup of hot coffee to go with them. They certainly worth the extra effort to wake up slightly early to make them for my family. I have never woke up to the smell of buttery scones baking in the oven, but I am sure it must be a very nice feeling...


Towering High Cranberries Scones

Ingredients:
(makes about 9, using 4cm cutter)

200g cake flour
2 teaspoons baking powder
50g unsalted butter, Cold, cut into small cubes
30g caster sugar 1 pinch of salt 90ml milk, I replaced with plain yoghurt
40g dried cranberries, cut into smaller pieces

extra 1 tablespoon milk for brushing
some icing sugar for dusting

 Method:
  1. Sieve cake flour and baking powder into a large mixing bowl. 
  2. Place unsalted butter into mixing bowl. With a fork, cut the butter into the flour mixture until it resembles coarse crumbs. 
  3. Add in sugar, salt and dried cranberries, toss gently until just combined. 
  4. Add in milk, gather the mixture to form a rough dough. 
  5. Place dough on lightly floured work surface. Knead the dough gently for about four to five times. -
  6. Pat the dough to a rectangle shape, about 3cm thick. 
  7. Cut the dough into half. Stack one half over the other. Pat the dough into 3cm thick rectangular shape again. 
  8. Repeat the above step for another 2 times (note: handle the dough lightly, scones will become tough when over handled.) 
  9. Finally, pat the dough into 2cm-2.5cm thick. Use a lightly floured cookie cutter (4 cm diameter), cut dough into rounds. To ensure better rise, press the cutter straight down, do not twist the cutter. - Gather the remaining dough, pat into 2cm - 2.5cm thick and cut out the remaining rounds. -
  10. Place the rounds on baking tray (lined with parchment paper) about 1 inch apart, brush top with milk, sprinkle with icing sugar (I replaced with caster sugar since I couldn't get icing sugar). 
  11. Bake in preheated oven at 200degC for 10-12mins or until lightly browned. Transfer to wire rack to cool, serve warm.
Recipe source: 幸福烘焙工坊, by 本间节子
Pardon my absence from the blogging world...although I doubt I would be missed by anyone ;)

I am quite disappointed that I am not able to visit my regular blogs here in Beijing. Even though I have set my google readers before leaving home, nothing shows up when I tried to access it here. Well, guess I have to do a lot of catching up when I get back by the end of the year.

Although I am away from home, I don't really feel like I am on holidays. Other than the cold weather and the rather laid-back weekends, our weekdays are just like any other day. My kids will spend the mornings doing their holiday assignments while I reply emails to friends, do my groceries and prepare lunch. In the afternoons, my boys are very much pre-occupied with watching cartoons, playing games and letting off their energy by playing table tennis at the fitness centre. Life is pretty much as usual.


I still get to do my baking, at least once a week, if not more.


One of my latest bake is none other than a simple pizza for our dinner last night.


Believe it or not, this pizza requires No Kneading at all. Perfect for a lazy baker like me!

I have made this once, before I left home for Beijing. It was so good that I recommended it to my cake friend right away. She couldn't resist the temptation to make it for her family after I showed her pictures of my boy tucking away into a hearty slice of homemade pizza. I had to share the idea with her since she was the one who introduced me to her magical rolls

...that is, The Pioneer Woman's cinnamon rolls. I used the exact same dough recipe for the pizza base, so, no kneading is required. I did make some slight adjustments, ie, I replaced the milk with plain water, and this time, I also cut down the sugar amount a little (as suggested by my cake friend) so that the pizza base would not taste as sweet. Her's turn out great as well! Even though she didn't take any pictures, I had no difficulties conjuring an image of her boys and hubby wolfing down her delicious, made from scratch, homemade pizza.


I managed to make two pizza from the small batch version of the original PW's cinnamon dough recipe...a big regularly one to fit the drip pan, and a small round 8" 'personal' pan pizza.

Just like making the cinnamon rolls, the dough is as sticky and soft to handle...but after dusting it freely with flour, I was able to flatten the dough and spread it out as thin as possible...no rolling pins required, since I don't have one on hand. Unlikely most pizza doughs, this one is sooo 'baby-bottom' soft that it doesn't shrink back while trying to flatten it. One thing to note is, I spread the dough out directly on the parchment paper...it makes handling the dough much easier.


For once, I didn't make any hawaiian pizza for my children. Instead, I topped it with fresh white button mushrooms, salami slices, capsicums, mini tomatoes...


The texture of the pizza base is very soft and very bread-like...great if you like pan pizza. I love how the combination turns out...especially the fresh, juicy toppings :)

What more can I say, nothing beats a slice of homemade pizza, especially when it doesn't requires much effort. A truly, kneadlessly simple, everyday meal that everyone can put it together, either for their own indulgence or for their loved ones...

so, what are you waiting for?!


No Knead Pizza Dough

Ingredients:

1 cup water
1/4 cup vegetable oil
1/4 cup caster sugar (I used 40g)
1 1/4 teaspoons active dry yeast (I used 1 teaspoon Instant yeast)
2 (250g) cups plus 1/4 cup (30g) plain flour
1/4 teaspoon baking powder (heaping)
1/4 teaspoon baking soda (scant)
1/4 tablespoon salt (heaping)

extra flour for dusting

pizza toppings and grated mozzarella cheese


Method:
  1. Mix water, sugar and vegetable oil in a pan. Scald (heat until just before boiling) the mixture. Leave to cool for 45mins ~ 1 hour.
  2. Place 250g (2 cups) plain flour and Instant yeast in a mixing bowl. Make a well in the centre and add the above mixture. Stir with a spatula until the mixture comes together to form a thick batter. (If using Active Dry Yeast, sprinkle the yeast into the mixture and let it sit for a minute before adding it to the plain flour.) Cover and let the batter sit for at least 1 hour.
  3. Add in the remaining 30g (1/4 cup) flour, baking powder, baking soda and salt. Stir until the mixture comes together. Either go ahead to make the pizza or cover and leave to chill in fridge over night or until needed. If left to chill, check the dough and punch it down by folding with a spatula if the dough rises almost to the rim of the mixing bowl. (Note: dough will be easier to handle if left over night.)
  4. When ready, place a sheet of parchment paper on a baking tray. Dust parchment paper generously with flour, transfer dough onto parchment paper. Dust dough freely with flour, dust hands with flour, flatten and roll out the dough into a thin round or rectangular shape, as desired.
  5. Spread dough with a layer of pizza sauce, top with some grated mozzarella cheese. Arrange toppings over the surface evenly. Top with more grated mozzarella cheese, bake in preheated oven at 200degC for about 15 mins or until the pizza base turns golden brown and the cheese melted.
Recipe source: pizza dough recipe adapted from The Pioneer Woman's cinnamon rolls
2 December 2011…


Friday…


0 deg C


First snow...


in Beijing...


This is our third winter in this city…


but it was only this morning…


we saw the first snow…falling…


down, from the Beijing sky…


snow...


snow...


and more snow...


My boys had a great time, playing in the snow…
I had a great time, watching them playing in the snow…
We are looking forward to the next snow…

Oh please,

Let it snow, let it snow, let it snow…


(the photos in this post appear faded and washed out, which is intentional...)
Nothing beats a nice, warm homemade muffin over a cup of hot coffee, especially in a cold, wintery afternoon.


These banana raisins muffins are the very first bakes I made in the tiny kitchen of this small service apartment that we will be staying for the next few weeks. The kitchen area is not more than 1.5m by 1.5m, but it is very well equipped. Besides the basic utensils, there is even a spatula and a stylish balloon whisk.


Knowing that I will miss baking for the entire period that we are away, I brought along my digital weighing scale, a small pack of caster sugar, and at the very last minute I stuff in a pack of flour into my luggage, just in case. I had reminded myself to bring along some disposable foil pans but had totally forgotten about muffin cups. Luckily, I manage to get some while shopping for groceries here, if not, I am sure my cyberfriend, VB would be more than eager to dispatch some over to me ;)


I have on hand some very rippped bananas, a small pack of raisins, eggs, vegetable oil, sugar, flour and baking powder. With just a few strokes, these basic ingredients was magically transformed into a batch of soft and fluffy muffins. I stood by the oven to watch how the muffins ballooned and domed…at the same time letting myself engulfed in the wonderful sweet aroma of banana muffins baking in the oven.


The oven in the apartment didn't disappoint me. I really like how these muffins turn out…the crust is a little crisp, yet the centre is very soft and moist. One of the simplest pleasures in my life…is to be able to sink my teeth into a delicious medley of fluffy crumbs, tiny chunks of bananas and sweet, plumped raisins. A simple cake is all I need to keep me very happy the whole day :)


Banana Raisin Muffins

Ingredients
(makes 7 muffins)

50g caster sugar
2 eggs, lightly beaten (about 50g without shells)
50g vegetable oil (I used canola oil)
2 large over ripped bananas, roughly mashed (about 210g)
150g cake flour
1 ½ teaspoons baking powder
50g raisins

Method:
  1. Pre heat oven to 180degC.
  2. Soak raisins with some water or orange juice for about 10-15mins. Drain and pat dry. Lightly coat with a teaspoon of flour (extra), remove any excess flour.
  3. Sieve flour and baking powder, set aside.
  4. Roughly mash bananas with a fork.
  5. Place sugar, eggs in a mixing bowl. Whisk with a balloon whisk to combine.
  6. Add in oil, whisk to combine.
  7. Add in mashed banana, stir with a spatula to combine.
  8. Sieve over flour mixture, stir with spatula until just incorporated. DO NOT Overmix. The batter should appear lumpy.
  9. Spoon batter into paper muffin cups, fill to ¾ full.
  10. Bake at 180degC for 25mins until golden and a toothpick inserted into the centre comes out clean. Transfer to wire rack, leave to cool completely.