Welcome to our website !
Ever since I started planning for my renovation, I realised that my kitchen is the Heart of my home.

Although the kitchen occupies a space that is less than ten percentage of the whole house, I spent the most time planning for it. Other than the two bathrooms which are giving me headaches because of the poor layout, the bedrooms and living areas don't really need my full attention. Thanks to the 'standard' layout of our flat, there is nothing much one can play around when it comes to designing the bedrooms and living room. The beds have got 'designated' areas...the wardrobes got to be at that corner, unless you want to hack away walls and combine two bedrooms into one. My living room is worst...mine is a square...there really isn't much choice after considering human traffic and our life style...the tv has to be against that particular wall, the sofa set will naturally be placed around it. I only have to agonise over the selection of floor tiles and the choice of colour for the walls.

In contrast, my small kitchen, with a size of around 100 sq ft needs careful planning and attention to details. There are so many decisions I have to make...from selecting the wall tiles, floor tiles...to deciding on the material for the kitchen counter top, the type of stove, sink, oven; down to dish racks and even the tap for the sink! The 'right' decisions has to be made as once the things are fixed up, it is not easy to make changes.


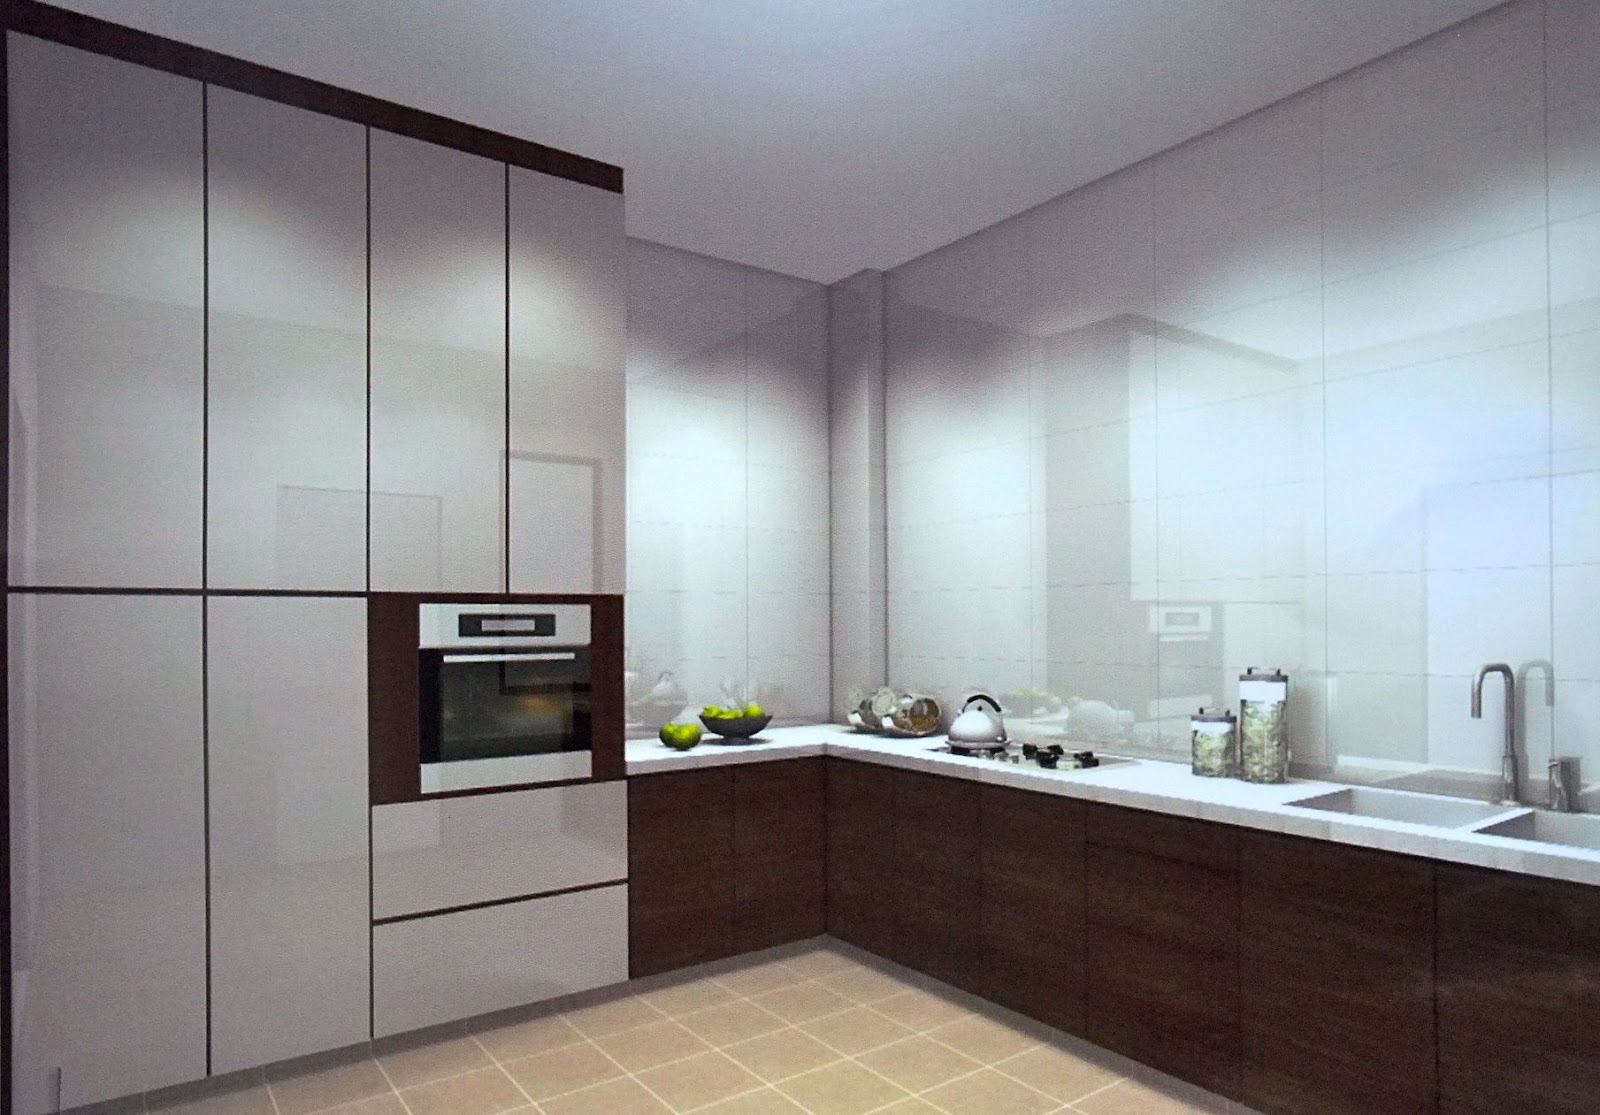
I was a little surprised when my renovation contractor handed me this 3D drawing so that I could visualise how my 'new' kitchen will look like. First of all, he is not an interior designer, I have engaged him because of his many years of experience as a contractor. With our simple layout, we don't really need an interior designer, and also, I am very much a DIY person, I like to do things the way I want it ;)

I am also surprised how well he has captured what I had in mind...I would say his 3D drawing (likely done up by his staff, as I really doubt he knows how to use any electronic devices except his mobile phone) is close to 80% of what I had envisioned. What amazes me is that, he doesn't carry a notebook (be it paper or electronic) to jot down whatever details that I have told him, yet he is able to remember every single item...he has to run several projects at a time and not forgetting he owns the firm. I wonder how he manages his schedule...he doesn't rely on a blackberry or an iphone (he told me he junk it after 3 days because the battery doesn't last long enough for his usage), neither does he carry a traditional diary or planner. He records everything in his brain. I really wonder what he puts inside his business suitcase which he carries along when he meets potential clients?!


I have been asking my contractor when I could get the detailed drawings of the kitchen cabinets, he told me they could only provide it after taking the exact measurement, ie when the floor and wall tiles are up. So, instead of waiting for his drawings, I did up my own.

I used to have a U-shape kitchen layout with the sink at the side. I didn't like the awkward position of the sink, so my kitchen will be a L-shape. There is space for a tiny island, but I didn't want anything 'fixed' or 'cast in stone'. I rather place a small dining table in the middle of the kitchen...which can double up as breakfast counter or a workplace for me to knead bread dough.

My ceiling height is higher than usual...it is almost 10ft or 3m high. As such I am doing away with the top cabinets this time so that it goes with my 'design principle'...easy maintenance and less things to clean. I am also spared the agony of deciding whether my kitchen will be an open concept design...the layout of my house just doesn't allow it.


After converting my existing store room to a walk-in-wardrobe, I need to look for alternative storage space. With the benefit of a high ceiling, I am able to build a tall cabinet tower at the side of the kitchen. I already told the contractor that I wanted to have more drawer units, and he has kindly agreed without charging me extra. I guess I should be happy with 4 drawer units compared to just 1 previously. The drawers will come in different heights to provide greater storage flexibility. I have also requested for more shelving as my previous kitchen cabinets only have got 1 layer of shelf.

If you have noticed, unlike most common practice, I will be installing stainless legs for my kitchen cabinets instead of letting them sit on concrete base. This is slightly against my design 'principle' as this means I have to take extra effort to clean and mop under the cabinets. Personally, I think this is a small price to pay in the longer term. The main reason that prompted me to renovate my whole house was that my old kitchen cabinets were growing mould! Especially those areas near the sink and floor trap. My old cabinets were sitting on concrete base, and due to humidity, condensation occurs underneath the sink area, creating a very conducive environment for mould to prosper over time. So, I rather spent some extra effort to clean the place than to worry over that I am storing my kitchen utensils inside 'incubators' for mould and fungus.


Although I do not know much about interior design, I have read about the kitchen work triangle ever since I got the keys to my house many years ago. I am glad that my new kitchen design is able to adhere to the work triangle even with the new location of the fridge. I have made the right decision to reposition the entrance of the guest bathroom and the store room. With the corner all sealed up, I am able to place the fridge in that location and free up the ex-fridge space to make way for the build-in oven and more kitchen cabinets. And it just happens that the new position for the fridge is between the stove/sink and the kitchen entrance. This allows other family members to access the fridge without 'interfering' the work triangle when someone is cooking.  I will probably have to look for a small side table to be placed at the side of the fridge to help ease in unloading groceries.

The main fault of my kitchen layout is that it doesn't adhere to good feng shui principle :( The stove is opposite the kitchen entrance...a no no for someone to cook with his/her back facing the entrance. Besides feng shui, it is for obvious safety reasons too. One way to overcome this is to place a mirror above the stove to allow the cook to know whenever someone enters the kitchen. Even though by placing a mirror above the stove will also serve to magnify wealth, I doubt I will ever install one! Not everyone looks like a domestic goddess in the kitchen and I certainly can do without a mirror when I am going about preparing dinners! I guess I should be fine with this layout since I am already used to getting startled whenever my kids stealth into the kitchen while I was cooking (^^')

See, I am not kidding, there is so many things to consider when planning a kitchen. Now that the kitchen wall and floor tiles are almost done up, the next daunting task for me is to select the laminates for the cabinets and the colour of the kitchen counter top.

Thanks to all readers for sharing your experience with your ovens and taking time to participate in the poll. Here's the result of the poll:

Bosch HBN331E2J 81 votes (46%)
Brandt FE811XS1 47 votes (27%)
Ariston FZ61.1IX 45 votes (26%)

I have finally decided that I will be getting Bosch HBN331E2J after hearing good reviews about it. Besides, it has emerged as a clear winner in the poll, with 81 votes out of 173. It is a close fight between Brandt and Ariston though, with Brandt leading by two votes. I am sure they are all good basic ovens to begin with.

I promise I will do a review of the Bosch oven when I get back to my baking routine. In the mean time, I will love to hear your comments on my kitchen layout/design, I welcome any suggestions to make my kitchen a functional one so that it can really serve its purpose as the heart of my home :)


When I started planning for my home renovation, looking for a suitable built-in oven was one of the very first item I researched on. It has been 3 months since, but, I have yet to make the final decision (^^')

It was only after reading through comments and reviews from various online forums, I learned that there are many features and functions available in built-in ovens. Terms such as pyrolysis cleaning, catalytic self cleaning, tangential ventilation got me really confused. Pardon my ignorance...for the past few years, I have been using this simple, small (20 litres) table-top oven with only a set of heating elements at the top; whereas even the most basic built-in ovens have got top, bottom heating elements with a fan. To make things more puzzling...different brands use different terminology when it comes to naming the numerous cooking functions available..eg. Traditional Pulsed, 3D hot air, Multi-cooking sounds different but they actually refers to the same function. I had to study and compare the various catalogs in order to fully understand the differences.

After going through all the information I have gathered, I decided that I will only need a very basic oven. I do not need one that comes with self-cleaning functions, since I do not do that much of roasting. Furthermore, most ovens that come with pyrolysis self cleaning (heating the oven to 500degC for 1 ~ 2 hrs to 'burn' the stains on the walls to ashes, so no cleaning is needed, you just need to wipe away the ashes) would require a loading of 15 or 16 Amp (our current flat can only take up to 13Amp). Even if a separate socket is installed, the air condition and oven is not to be operating at the same time, to prevent tripping of the electric power. I do not need an oven from a higher end...eg one that comes with 10 cooking functions as I doubt I will use all the functions. So the very good ovens from brands such as Miele and De Dietrich will never get into my list. Since I am not a professional cook or baker, I would probably not be able to do justice to using such good ovens. Even if I have the budget, I would rather spend the money on a holiday trip ;)

Besides the price, the main selection criteria when it comes to choosing an oven for my 'new' kitchen will be the oven door! The oven door has to be sturdy and will close tightly. The oven should come with tangential ventilation, ie, when the oven reaches a certain temperature it will blow out hot air to cool down the oven. I am also looking at ovens that have got triple or at least double layers of glass doors.

After visiting showrooms to look at the physical products, I have finally narrowed down to 3 choices...they are the basic range from Bosch, Brandt and Ariston. They are all within the same price range, offering similar functions. In fact, they are so similar that I am not able to make up my mind which one I should get?!

So, will it be this B...

Bosch HBN331E2J
* Capacity: 52 litres
* 5 Cooking functions:
  - Conventional top and bottom heat
  - 3D hot air (top, bottom and heating element
    around fan)
  - Bottom heat only
  - Hot air grilling (grill and fan operate alternately)
  - Full width variable grill
* EasyClean enamel coating
* Electronic clock with timer
* Double layer glass door (removable for cleaning)
* Oven accessories: 1 universal pan, 1 split grill tray
* Energy efficiency class: A
* Country: German Brand
* Retail price: $749


or this B?

Brandt FE811XS1
* Capacity: 52 litres
* 6 Cooking functions:
  - Traditional Pulsed (top, bottom heat and fan)
  - Traditional (top and bottom heat)
  - Fan Assisted Grill (top heat and fan operate
    alternately)
  - Grill (top heat)
  - Pulsed Oven Shelf (bottom with light grill and fan)
  - Special Poultry (top with some heat from bottom)
* Activemail interior (anti-stain, anti-corrosion,
temperature resistant enamel)
* Timer function
* Double layer glass door (not removable)
* Oven accessories: 2 safety grid racks, 1 large drip tray
* Energy efficiency class: A
* Country: Made in France
* Retail price: $899


and what about this A?

Ariston FZ 61.1 IX
* Capacity: 58 litres
* 6 Cooking functions:
  - Traditional (top and bottom heating)
  - Multi-Cooking (top, bottom, circular and fan)
  - Barbecue (top only)
  - Gratin (top and fan)
  - Pizza (bottom, circular and fan)
  - Baking (rear heating and fan)
* Inox clean stain resistant surface
* Timer function (w/o auto cut off)
* Triple layer glass door (removable for cleaning)
* Oven accessories: 1 dripping tray, 1 grid
* Energy efficiency class: A
* Country: Made in Italy
* Retail price: $709


Decision, decision, decision...

Which one will you choose?
“What we call the beginning is often the end. And to make an end is to make a beginning. The end is where we start from.” ~ T.S. Eliot


It took me 4 days to clear away every single item from my house. I was really surprised by the amount of 'junks' I have been keeping for the past 14 years (^^')

Even though I must have thrown away half of our 'possessions', I still ended up with 30 boxes of barangs barangs (personal belongings). Here's some stats to illustrate...I sold away:
~ 100kg of old textbooks, activity books, worksheets, assessment books, magazines, etc,
~ 50kg of old clothing, bed sheets, towels, etc
to the karung guni (modern form of rag and bone men). I 'earned' a total of $15. I also sold away my fridge, washing machine, two fans and a radio for a total of $70. I got $10 by selling away my king size bed.

I managed to clear away 90% of our old furniture, and I do hope my 'new' house will not have more than 8 pieces of furniture. I am a minimalist...but this time I will work even harder to keep everything simple...my main aim is to minimise daily cleaning and maintenance :)


After 4 days of hacking, my whole flat was stripped down to its core. Here's my kitchen...it looks almost like a war zone!

There will only be bottom cabinets for my kitchen...and a tower unit by the side. This is my first step of reducing storage space. You may think I am crazy since most people ask for extra storage space. For me, the more space I have means I will fill it up with more junks! I used to have a row of top cabinets which I used it as a 'store'...keeping things I hardly use at all. One classic example: we have been keeping bottles and bottles of Coke which we bought during our holidays overseas. I spent close to 20mins opening 40 bottles (or more!) of Coke and pouring away the content before I could dispose off the empty glass bottles. Not forgetting the numerous cans of Coke I have throw away several years back. This is something I don't wish to happen again.


This is my guest/common bathroom...I have re-positioned the entrance so that the new entrance will be at the service yard instead of the kitchen.


New entrance to the guest/common bathroom. I won't have to see my younger child doing his business in full view any more ;)


This is yet another step to 'reduce' storage space. The entrance of the store will be shifted from the kitchen to the bedroom. I am going to convert the existing store room to a 'walk-in' wardrobe...literally. The space is only 1m by 2m...just enough for a person to walk into the closet to retrieve the item. Yes, it is going to be a tiny closet...but I am the sort who can survive with less than 10 sets of cloths, the space is more than sufficient. Without a store room, the only problem I am going to face is to find storage space to keep my kids' books...I hope the new build in wardrobe cum book shelves will be big enough to address this issue.

Although I have no intention to convert this into a renovation blog, I won't be able to post anything on baking for the next couple of months. I hope I don't bore you too much with this post (^_^).  
This must be the longest October for me.

I spent the first two weeks of the month sourcing for renovation contractors, reading up on renovation, visiting tile shops to select tiles, shopping around for lighting, bathroom sanitary ware, cooker hobs, oven, etc, etc. This is in preparation for my upcoming renovation of our house. The next two weeks were spent packing, packing and packing. On top of that, it was an anxious week when my elder son took the PSLE examination. I am glad that all went well, but before I could take a breather, it was soon my younger child's turn to sit for the year end school examination! Finally, his exam is over today. I am not done with packing yet...I still have to conquer the kitchen...which I have no choice but to leave to the last.

Anyway, I miss blogging...so I am here to share with you yet another chiffon cake recipe, before I dismantle my desktop computer and pack it into boxes.


This chiffon cake was made with purple sweet potatoes. I have came across two types of purple sweet potatoes...one of which comes with purple skin but the inside is yellow...and the other with both skin and the inside purple. This chiffon cake was made with the latter. It was by chance that I bought a bag of purple sweet potatoes. I actually wanted to get some spring onions and nothing else...but I was too shy to ask the stall owner. So I looked around and spotted the sweet potatoes...in the end I only paid for the sweet potatoes and the stall owner gave me the spring onions for free (^^')

There was no surprises when I went about preparing this chiffon cake. Although I must say, it was like attending some Chemistry lesson. I was amazed that the egg yolk batter, which was a deep purple because of the sweet potatoes, turn into a pretty pinkish batter the moment the few drops of lemon juice was added to it!

After the past few experiments in making chiffon cakes, I was quite satisfied with how this one turn out. The cake rose well in the oven, and it didn't shrink too much upon cooling :)


A few readers have asked me how I managed to unmold my chiffon cake nicely.  This time, I made it a point to take step by step photos to show all of you. I guess, the trick is to use a very thin bladed knife. When running the knife inside the cake pan, try to slide the knife as close to the inside of the pan, avoid slicing the cake crumb. I am not sure whether it is because of the quality or the type of cake pan that I am using, I am able to remove the cake effortlessly, without creating any mess. See photo 3 above...upon unmolding, there were not much crumbs left inside the pan.

I think it is also the type of cake pan that I am using, I always end up with chiffon cakes with 'pork-floss' like crust.


This chiffon cake was very soft and moist. The crumbs was a light pink...if the lemon juice were to be omitted, the crumbs would end up dull purplish. It was a fun experiment for me! This cake tasted really good, but I would still rank that banana chiffon cake as the best chiffon cake I have ever made ;)

I won't be sharing any baking post for the next two months as my kitchen is officially closed for renovation starting from today. However, I will still try to update my blog...but it will probably on the progress of my renovation or the holiday trips that we have planned.


Purple Sweet Potato Chiffon Cake

Ingredients:
(for 17cm or 7" tube pan)
(measurements in brackets are for 20cm or 8" tube pan)

40g  (70g)    egg yolks
50g  (80g)    water
40g  (70g)    vegetable oil
7g    (12g)    lemon juice
54g  (90g)    purple sweet potato, boil or steam, mashed
50g  (80g)    cake flour
10g  (20g)    caster sugar
70g  (120g)  purple sweet potato, boil or steam and diced into small chunks


110g (180g)  egg whites (cold from fridge)
55g    (90g)  caster sugar
5g     (10g)   corn flour

Method:
  1. With the skin on, either boil with water or steam the purple sweet potato till soft (test with a fork, it should be inserted easily into the centre of the sweet potato). Leave to cool slightly and remove the skin. Mash and dice into small chunks accordingly.
  2. Sieve cake flour, set aside. Sieve corn flour, set aside. 
  3. Place egg yolks, water, mashed sweet potatoe in a mixing bowl. With a manual hand whisk, whisk the mixture to combine. Add in the vegetable oil, stir to combine. Add the lemon juice and stir to combine. (Note: the mixture will turn into light pink.) Sieve over the cake flour and whisk till the flour is fully incorporated and the mixture becomes smooth and sticky. Add in caster sugar, stir to combine.
  4. In a clean, dry mixing bowl, beat egg whites with an electric mixer on low speed until mixture becomes frothy and foamy. Turn to high speed and gradually beat in the sugar, 1 tablespoon at a time, add in the corn flour together with the last tablespoon of sugar. Beat until the egg whites reaches the soft peak stage.The soft peak stage is reached when the peaks of the whites curl over and droop slightly. The egg whites should appear smooth and glossy. (Do not over beat the whites still stiff, it is better to beat the whites still soft peaks for easy folding with the yolk batter.)
  5. Add the beaten egg white into the egg yolk batter in 3 separate additions, each time folding gently with a spatula until just blended.
  6. Add the sweet potato chunks. Stir gently to combine.
  7. Pour batter into a 17cm tube pan (do not grease the pan). Tap the pan lightly on a table top to get rid of any trapped air bubbles in the batter.
  8. Bake in pre-heated oven at 160 degC for 35 mins, (for 20cm pan bake for 50 mins) or until a skewer inserted into the center of the cake comes out clean. (When lightly pressed the cake will spring back). Remove from the oven and drop the pan at a height of 20~30cm onto a table top. This action helps to keep the springy texture of the cake when it is left to cool.
  9. Invert the pan immediately and let cool completely before unmould. To remove the cake from the pan, run a thin-bladed knife around the inside of the pan and the center core. Release the cake and run the knife along the base of the pan to remove the cake.
Recipe source: adapted from 戚风蛋糕秘法传授 by Noriko Ozawa


Sweet Potato on FoodistaSweet Potato
十月六日...对很多人来说,只是一个普通的日子。不过今天对我的老大来说却是个大日子。今天是小六会考的第一天!真相希望他在考场能够有所发挥 :)

It's the start of the PSLE today. In a week's time, the examination will be over, and it also means that my elder child would have completed his 6 years of primary school education. How time flies! While I was packing up our old photo albums, I couldn't help but laughed at how cute he looked when he was in primary one ;)

As the examination drew closer, I found myself more relaxed. I believe I have finally reached the S4 level as a 'leader' based on the Situational Leadership model (by Kenneth Blanchard and Paul Hersey) and my child as a 'follower' has moved to the D4 level (someone with high competence, high commitment – experienced at the job, and comfortable with their own ability to do it well, may even be more skilled than the leader.)

Two months ago, I noticed my elder child began to pick up momentum in his preparation for the exam. He demonstrated a zealous attitude in wanting to do well...he planned out his revision schedule and time tables, and even set his own targets for each subject. I didn't even have to sit down side by side with him to go through his work. He did his revision mostly by himself. Whenever I felt guilty, I would spend a few moments of my time just to check that he was doing ok on his own. When it was down to 4 weeks before the D-day, I was too preoccupied with the planning of my home renovation. I am glad that without my close supervision, he was still able to study hard, real hard, I must say, for he is still a child. Sometimes, I even joked that it was as though he was preparing for some university entrance exams...you will be amazed with the piles and stacks of files, assessment books, etc, lying all over our house. As the day drew even closer, I found myself giving him lots of hugs everyday...I am so pleased with his learning attitude. My role as a 'coach' now, is to keep encouraging and assuring him that he will be fine. Very often, he worries that he won't pass with good grades...he lacks self-confidence. So I have to tell him, with the effort he has put in, I am sure even if the end result is not as expected, he won't live with regrets. I hope he understand what I meant when I told him..."The process is more important than the results. Some other people may think otherwise, but to mama, your learning attitude is more important than anything else, and I want you to hold these values with you all the way to your adulthood." I know very well his limits and potential. I don't expect him to pass with flying colours (it will be a miracle), but I am assured that he won't do too badly either. What more can I ask for?


On a lighter note, I will like to share with you this sweet treat...Dessert in a Toast Box! I happened to chance upon a video clip when I was looking for recipes on how to make Korean mochi buns. This is something so interested that I wasted no time to try it once I managed to bake a decent homemade pullman loaf.


It is basically a bread 'box' topped with fruits and scoops of ice cream. Inside the 'box' are layers of toasted bread 'cubes' drizzled with honey. I also topped it with some homemade breakfast granola. Sounds delicious isn't it?! I have tried with both a plain white loaf and a wholemeal bread...both are equally good. I hope the instructions I have posted below is clear enough...and if you happen to try it, I am sure you will have fun both preparing and eating it!


Dessert in a Box


Cut a 11cmx11cmx20cm pullman loaf into half, you will get two bread 'cuboids'. With a serrated knife, make a cut on each of of the 4 sides of a bread cuboid, leaving a gap of around 1cm from the edges. Make a slit along the base of the box (see illustration below, refer red line at the base).  Carefully remove the bread.

Slice the bread into 3 layers. Cut into 4s for each layer to get a total of 12 small cubes. Spread all the 6 surfaces of each cube with butter. Spread the insides of the bread 'box' with butter.

Place the bread box in the oven (preheated to 180 degC) for around 10mins or until the surfaces turn golden brown. Heat up a non-stick pan. Over medium to low heat, toast the bread cubes until they turn golden brown. Note: You can also toast the cubes together with the bread box in the oven, turn the cubes around so that all the surfaces are golden browned. Leave to cool off a little.


Place the toasted cubes into the bread box, layer by layer. Drizzle with honey on each layer. Press the bread cubes down a little to provide room for the toppings.


Place cut fruits (strawberries, blueberries, peaches, banana, kiwi fruits, grapes, etc) in the box.


Top with scoops of ice cream, a sprinkle of nuts (I topped it with my homemade breakfast granola) and a drizzle of melted chocolate. Serve immediately.


Dear Reader,

Here's wishing you a Happy Children's Day :)


Children's Day is a good time to remind ourselves that we were once kids, and we should take this opportunity to recapture our childhood innocence, shouldn't we?

This year, it will be the last day we are celebrating Children’s Day on 1st October. Starting from 2011, Children’s Day will be celebrated on the first Friday of October instead. The rationale is to offer an extended weekend to students and to give parents more time to spend with their children :)


After a fun-filled day in school, my kids were still in a merry-making mood...and upon their request, I made them some caramel popcorns for their afternoon treat.


This is not the first time I am making popcorn at home. I used to think that popcorn can only be made with a microwave oven...using those microwave popcorn packs. After stumbling upon some video clips sometime back, I realised that popcorn can be easily prepared with a pot over a stove. After watching the video and looking at some online recipes, I jumped head-on to pop my first bowl of popcorn. My first attempt failed miserably, there were far too many unpopped kernels left in the pot and the popcorn didn't taste as light and crispy. On my second attempt, I burnt most of the popcorn (^^'). It was only after spending 15 minutes watching a free demo session by a lady who was promoting some anodised woks in a departmental store, that I learned the correct method of popping popcorn. By following her method, almost every kernel pops, and I have not burnt any popcorn since!


The caramel for the popcorn is very simple to prepare...you use need to melt some sugar in the wok before tossing in the popcorn with some grounded peanuts and sesame seeds. This is a delicious treat both children and adults would enjoy. If you ever happen to try this, I hope you will enjoy making the popcorn as much as eating it. Once again, Happy Children's Day!!! 


Caramel Popcorn

Ingredients:

4 tablespoons popcorn kernels (I use organic ones)
3 tablespoons cooking oil (I use canola oil)

4 tablespoons sugar (use 6 tbs for a sweeter taste)
2 tablespoons coarsely grounded peanuts
1 tablespoon sesame seeds

Method:
Heat up a wok (use a heavy-base wok to prevent the popcorn kernels from burning) over high heat. When the wok is very hot, add in the oil. Turn heat to medium-high and add in popcorn kernels. Stir with a wok spatula until the popcorn kernels are evenly coated with oil. Keep stirring until the first kernel pops (takes only a few seconds). Cover the wok immediately with a lid. The popcorn kernels will start to pop all at once. As the popping continues, gently swirl the wok back and forth over the burner. Do this once or twice in between the popping. Wait for the popping to slow to a few seconds between pops. Turn off the heat, remove lid and transfer popcorn into a wide bowl. (Note, the inside of the lid will be covered with the cooking oil.)

Return wok to burner and turn heat to medium-low. Place sugar in the wok and let it melt. Do not stir, it will take a few minutes for the sugar to melt/caramelise. Turn off the heat when the sugar has completely melted. Return the popcorn into the wok and sprinkle over the grounded peanuts and sesame seeds. Toss with spatula to combine.


Our weekday breakfast foods are usually quick and simple...nothing beyond the usual bread with peanut butter, or the occasional slice of cake. Only during the weekends, I can afford the time to prepare something hot and delicious for my family.


I cooked this egg over toast over one of the past weekends. My elder boy likes sunny-side-ups. For a lousy cook like me, it is a challenge to cook it the way he likes his eggs done! That is, the yolk has to be slightly undercooked so that it will ooze out like golden lava when he pricks the 'sun' with a fork. Most of the time, the yolk already broke in the frying pan. If it is lucky enough to survive under my spatula, I would probably over cooked it (^^')

Nevertheless, no matter how it turned out, my child would still savor each morsel of his breakfast as though it was the most delicious food he has ever had. Am I asking too much if I were to blame my very forgiving children for my terrible cooking skills?!


My younger child, on the other hand, likes his eggs scrambled. The toast was a slice of homemade wholemeal bread I made using the tangzhong or water roux method.


Since I am watching my diet, I skipped the eggs and opted for some oven roasted cherry tomatoes to go with my toast. It is a simple dish to prepare with just a drizzle of olive oil and a sprinkle of salt and pepper. I used my small toaster as it heats up so fast that no preheating is required.

I will be updating my blog less regularly as the year draws to a close. I will be shutting down my kitchen by the end of next month as I am planning for a major make over, or rather, an overhaul of my entire house. I do hope I could still find time to do a little baking at my 'rented' kitchen.

In the mean time, I am calling all local home bakers, do let me know if you know of a good basic build-in oven to recommend. Yes, I am planning to get a bigger oven...50 litres compared to my current 20 litres is big! I really hope I am able to bake better cakes and bread with a better oven :)  


Oven Roasted Cherry Tomatoes

Ingredients:
(serves 1)

quarter punnet of cherry tomatoes
some olive oil
some salt and freshly grounded black pepper


Method:

Place cherry tomatoes in a baking dish. Drizzle olive oil over the tomatoes. Sprinkle with one or two pinches of salt and several turns of freshly grounded black pepper. Place in a toaster (or an oven preheated to 180 degC) and roast for 15-20 minutes or until the tomatoes have burst open.