Welcome to our website !
I first saw this honey sesame roast chicken over at Min's blog, and was reminded again when I hopped over to Jessie's blog a couple of days ago. The recipe came so timely, as I had planned to roast a chicken over the long weekend =)


I have no intention to post this up as I knew I would have problem taking photos in the evening. When I was plating the dish, my elder son came over to ask whether he could take a picture of the roast chicken. He told me he could adjust the camera settings to compensate the poor lighting, and so I gladly hand over the role of photographer. His brother was happy to be his assistant, trying his best to bounce some light to the subject from his touch light to my baking tray (^^") I didn't expect anything decent since we do not have any external flash and it was already very dark. Fortunately, the picture quality was good enough for me to post his photos here, at least no one would mistake the chicken for something else ;)


I butterflied (or spatchcock) the chicken before roasting hoping that the chicken would brown evenly. Yet, some parts tend to brown faster so I had to cover it with foil to prevent it from getting burnt. I roasted it for close to an hour, turning it over in between and basting it with the marinate before returning to the oven.


The original recipe calls for honey, but I replaced it with maple syrup since I did not have any honey on hand. Nevertheless, the roast chicken still tasted as good as I had expected or imagined, it was tender and juicy. I had it with rice while the rest were having a good time wrapping up the chicken meat with tortilla wraps. The roasted vegetables were really good, especially the roasted sweet potatoes and onions! I would gladly eat the veggies even without any chicken. There is no doubt about it...this is going to be a regular visitor on our table. Thanks to Min and Jessie for sharing their wonderful recipes!


It was love at first sight when I came across a Chocolate and Banana Bread while flipping through Linda Collister's book, Cakes and Bakes from My Mother's Kitchen. After a quick run through of the ingredients list, I had it bookmarked right away. Here's a quote from the author:

'This is a real treat for children everywhere or the big kid in all of us. Use milk chocolate and a banana~ or chocolate flavoured yoghurt for children or really dark chocolate and natural yoghurt for adults. This bread does improve with keeping - even for just a day.'

I am sold.


I would think most home bakers would try to bake something with bananas only if they were left with over-ripe bananas sitting on their kitchen counters begging to be used. For me, I specially bought a bunch of bananas and waited patiently for days, for them to turn black ;)

I stick closely to the original recipe and even took the trouble to measure my baking pans to make sure it fits the description of a '450lb size loaf pan'. I also bought a bag of self-raising flour just for it although I could easily do a substitution with plain flour and baking powder. I have bookmarked a few other recipes from this same book, and most call for self raising flour, so I am certain that it will be put to good use soon.


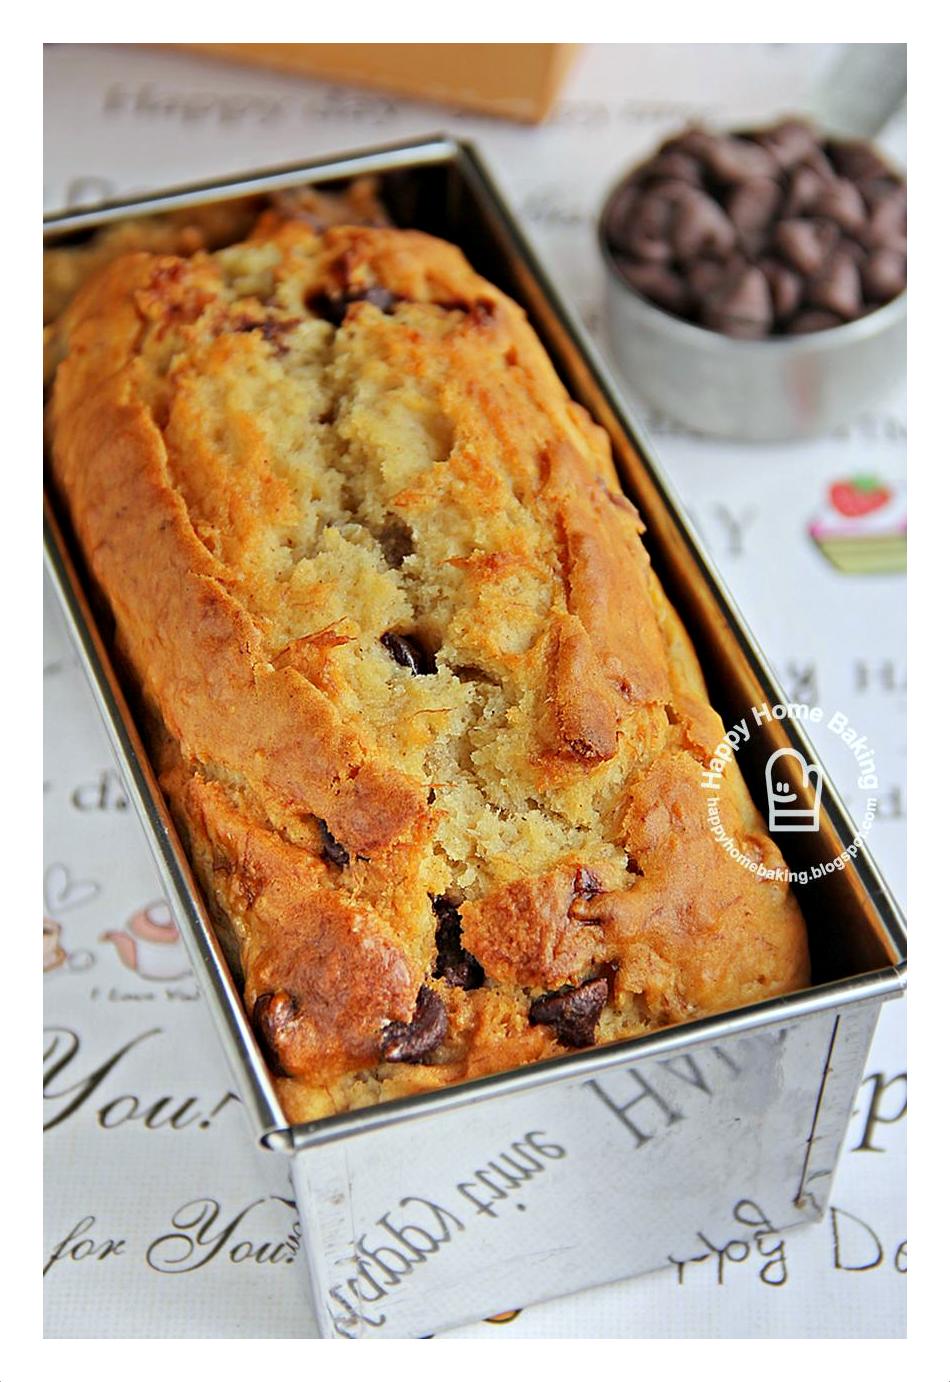
The finished loaves didn't look exactly like the illustration in the cookbook and that was largely my fault as I have replaced grated chocolates with baking chocolate chips. So, instead of a chocolaty, rustic loaf, I got a chocolate chips studded 'golden pillow' instead. I couldn't decide whether to love or hate the look of the finished loaves...from one perspective they were so awful but from another angle, I thought they looked cute and rustic all at the same time ;)


I encountered some mishaps when preparing the batter for this quick bread. Till now, I am not sure whether there is any typo error as I still can't believe that the amount of butter used is just a mere 55g? With so little butter compared to the amount of sugar and eggs, I was really skeptical that the batter would be 'fine'. Indeed, I had a busy time trying to cover the mixing bowl with my free hand to avoid having butter and suger splatting all over my counter. Fortunately, perseverance pays off, the heat from beating the butter caused the mixture to come together, from a bowl of 'sugary crumbs' to something I am more familiar with whenever I creamed butter and sugar together. I took extra care when adding the eggs, knowing that curdling would be quite unavoidable. True enough, the mixture did curdled into a mess of 'tau-huay' (bean curd), but not upon adding the eggs, but after I dumped in the yoghurt all at once. What a blunder!

Of course, I went on to add in the rest of the ingredients, keeping my fingers crossed all the time...hopping it wouldn't fall into that 'totally-waste-of-ingredients' category. Despite the blunders I made, the finished bread turn out to be deliciously moist and full of banana goodness. These bread loaves were truly flavours and fragrance-packed, since I took the liberty to add in some vanilla extract and ground cinnamon. Tell me, who can refuse a slice that is packed with banana, chocolate, cinnamon and vanilla? The author suggested to serve it thickly sliced with chocolate and hazenut spread (aka nutella), but I think it is really not necessary, but of course, no one will stop you or any kid from doing so :)


Chocolate Chips Banana Bread

Ingredients:
(makes two loaves, pan size: 17.5cmx9cmx6cm))

55g unsalted butter, room temperature
150g light brown soft sugar/ light muscovado sugar (I cut down to 120g)
2 large eggs, beaten
100g natural yoghurt
1 teaspoon vanilla extract (not included in original recipe)
350g over-ripe banana, mashed
300g self-raising flour
1 teaspoon ground cinnamon (not included in original recipe)
1/2 teaspoon salt
100g semi-sweet chocolate chips (original recipe calls for 200g milk or dark chocolate, coarsely grated)

Method:
  • Line base and sides of 2 loaf pans with parchment paper. Sieve together flour, ground cinnamon and salt, set aside.
  • With electric mixer beat butter and sugar until well combined. Gradually beat in the eggs, little by little, followed by the yoghurt (add in gradually too) and vanilla extract.
  • With a spatula, stir in the mashed banana. Fold in the flour mixture, followed by the chocolate chips until just combined. Spoon batter into prepare loaf pans, level the surface. Tap the pans on the work surface a few times to remove any trapped air bubbles.
  • Bake in preheated oven at 180degC for 40~45mins or until golden and a toothpick inserted into the centre comes out clean. (Optional: to ensure a nice crack upon baking, remove from oven after 15mins. With a knife, make a slit lengthwise along the centre of each loaf, return to oven and continue to bake until done). Leave to cool in pans for 10mins. Unmold, remove parchment paper, transfer to wire rack and leave to cool completely.
  • The loaves are best if wrapped in baking paper and kept for 1 day before cutting. Store in airtight container and consume within 4 days. Serve in thick slices with nutella spread, if desired.
Recipe source: Cakes and bakes from my mother's kitchen, Linda Collister
Ever since my elder child went on to secondary school, with longer school days, he hardly comes home for lunch. Gone were the days when the three of us would chit chat over the lunch table. With extra lessons and activities in the afternoons, I only get to have lunch with his younger brother twice or if I am lucky, three times on a normal school week. I know I shouldn't complaint, but I find it difficult to cook for just the two of us. I am ever so tempted to rely on take-outs instead of turning on the stove. But, the feeling of guilt will always come haunting me if I fail to put home cooked meals on the table.

So, I resort to fuss-free, whenever possible, fume-free, quick and easy to pull together, under 30mins meals...just like this parent and child donburi.


I was introduced to the Japanese cuisine way back in the early 90s. The first time I read/saw the kanji '親子丼' or oyakodon on the menu, I formed the impression that it is so named because it is a 'mother (母親) and child (孩子) meal'...a loving okasan cooks this special dish for her child; mother and child then sit down to enjoy the dish together. Indeed it was a very heart-warming scene I had conjured, a parent-child bonding thingy because I had subconsciously interpreted it based on the Chinese context of the characters '親子'. It was only many years later that I read that the parent and child here refers to the two main ingredients, chicken and egg! I felt really sheepish when I realised my mistake. Can you almost imagine how that scene in my mind was shattered? very anti-climate isn't it? lol! I should have known better since I learned long ago that many kanji words have totally different meaning from the Chinese characters.


When I first attempted to replicate this chicken-and-egg donburi at home, I used pre-mixed pack. Ok, I know, it is very embarrassing, but what to do for someone who was, and still is, a culinary idiot. Glad to say, I have since progressed from pre-mix, to cooking it, almost, from scratch. But it still lacks the real authentic flavour as I don't make my own dashi. I can easily cheat by using instant dashi powder but I don't want to, as the ones I saw available on the local supermarket shelves come with added msg. To avoid the hassle of making dashi, I used water...and, a dash of fish sauce! Believe it or not, it comes quite close to the real thing, at least my untrained, unsophisticated taste buds makes me think so. For the time being, this is the way I prepare this dish, but I am sure in time to come, I will make dashi from scratch.

P/S: I use this brand "Megachef' fish sauce(it doesn't contain msg), my friend VB has kindly sent it to me all the way from Hong Kong :)


Easy Oyakodo
(serves 2)

Ingredients:

1 large chicken thigh, deboned, remove skin, cut into bite site
1 medium size yellow onion, thinly sliced
2 eggs, very lightly beaten
2 tablespoons mirin
1 tablespoon sake (I replaced with ryori sake, Japanese cooking rice wine)
1/2 cup dashi (I replaced with water and a dash of Thai fish sauce)
2 tablespoons soy sauce (I used Japanese soy sauce, Yamasa brand)
1/2 teaspoon sugar
some spring onions, cut into 1" length
2 bowls of cooked rice

Method:
In a small frying pan, heat mirin and sake and bring to a boil. Add dashi, soya sauce and sugar, bring to a boil. Add onions, cook till soften, about 2 mins. Add chicken meat, leave to simmer for about 2 to 3 mins or until the chicken is cooked. Toss in the spring onions. Drizzle in the eggs, do not stir. Turn off the heat once the eggs is almost set. Place rice in a large serving bowl. Pour chicken and egg mixture over the rice. Serve with nori (optional).

Recipe source: adapted from 30种爆红人气外食
It took me a while to get back to making bread. I thought I would be churning out loaf after loaf of bread when I bought my new bread machine, instead I have been making simple stir and bake cakes more regularly that ever. Even though making a batch of bread buns is not as difficult as it seems, it does take up a fair bit of time...at least 3 hrs from gathering the ingredients to retrieving a tray of freshly baked buns from the oven. It needs proper time management and planning ahead, so that I won't end up in a situation that I need to get out of the house to run errands or to go fetch my child from school while the dough is ready for shaping into rounds.


I finally got down to make some bread buns last week, and that was when 'suddenly' the reality hit me that I may have to spend less time on baking in the future...


I have been keeping my digital to-do list on my phone diligently, whenever I am at a lost or couldn''t make up my mind what to bake it will come in very handy. First on my list is none other than Coffee Buns or better known as Roti Boy or Mexican Bread Buns. While the usual roti boy bread buns come with a buttery filling, I decided to skip it since I have yet to find a recipe that uses much lesser fat. We could do without the filling extra fat as I was very confident that the tangzhong bread buns would taste great even when eaten plain.


I love how these coffee buns or coffee cookies buns (as they were covered with a layer of cookie dough) turned out. These buns were delicious even without the filling. They were not as greasy as the ones I bought from the bakery, but it would be better if the coffee flavour was stronger. They smell really good though especially when they were baking in the oven.


As usual, the tangzhong dough didn't disappoint me, the texture of the bread was very soft. After taking the first bite...for the first time...I felt proud of myself that I have come 'so far'. I can still remember the very first batch of bread buns I made several years ago, they looked so horribly out of shape that I could feel my stomach cringe every time I was reminded of them whenever someone left me a comment on that particular post. Everything is self taught, from baking to taking pictures. Even though I have not moved beyond baking simple cakes and buns, at least my shaping skills have improved and I am able to take slightly better pictures compared to six years ago. Yes, my learning curve is definitely much longer than most who started their baking journey even much later than me. Yet, I truly enjoyed this slow learning process, taking my own sweet time to explore the world of baking and doing what I like.


I hardly buy cut-flowers but when I saw these lovely flowers looking so fresh at the florist stall, I couldn't help but to part away a couple of dollars for a stalk. That single stalk has enough flowers to fill up my tiny vase :) I have bread to feed my body and I have flowers to feed my soul, what more could I ask...


Back to the title of this post...

I will be going back to work. It is not a full time job and I get to work from home. No, the job I have been offered has got nothing to do with baking. It is a 'regular' freelance, home-based job and I'll get to earn some pocket money which I could spend on baking ingredients :) I will probably not be able to update my blog as regularly but I will still continue to bake, at least once a week, I hope...


Coffee Cookie Buns
(makes 10)

tang zhong (water-roux):
25g bread flour
125ml water

bread dough:
210g bread flour
56g cake flour
20g milk powder
42g caster sugar
1/2 tsp salt
6g instant yeast

30g egg, lightly beaten
85g water
84g tang zhong (water-roux)*

22g unsalted butter

topping:
50g unsalted butter
50g caster sugar
50g egg, lightly beaten
50g cake flour
1 1/2 teaspoons instant coffee powder
1/2 teaspoon vanilla extract
1/2 teaspoon warm water


Method:

to make topping:
* Dissolve instant coffee powder with the warm water, mix in vanilla extract. Set aside.
* Beat the butter with caster sugar, until light and fluffy. Add the beaten egg one teaspoon at a time, beat well after each addition (add in egg gradually to prevent the mixture from curdling). Add in the coffee mixture gradually, beat well after each addition. Sieve over the cake flour. Mix with a spatula until just combined. Transfer topping into piping bag fixed with pipping nozzle (round tip). Let the topping chill in the fridge until needed. Remove from fridge about 5~10mins earlier before use to allow the topping to soften a little.

to make tang zhong:
* Place 25g bread flour in a saucepan. Add 125ml water, mix till smooth, making sure there are no lumps of flour. Cook over medium to low heat, stirring constantly with a hand whisk to prevent it from burning. Within 1 to 2 mins, the mixture will start to thicken, stop when you see traces in the mixture for every stir you make with the hand whisk. The 65degC tang zhong is ready. Immediately transfer the hot tang zhong into a bowl and cover it with a cling wrap, making sure the cling wrap sticks onto the surface of the mixture. This is to prevent a film from forming on the surface. Leave to cool completely before using it.

to knead dough by bread machine:
* Place water, egg, tang zhong (use 84g), sugar, salt, bread flour, cake flour, milk powder in the pan of the bread machine (according to the sequence as stated in the instruction manual of your bread machine). Make an indentation on the flour and add in the instant yeast. Select the Dough function of the bread machine and press start. Leave the lid of the machine open (this is to prevent over heating). After about 10mins of kneading, add in the 22g of butter. Let the machine continue to knead the dough. After the kneading cycle has stopped (20mins), Stop and Restart the machine. Continue to let the machine knead for another 20mins. Remove dough from the bread pan. (Note: refer this post for instructions on how to knead dough by hand.)

* Grease hands with some vegetable oil (this helps to prevent the dough from sticking to your hands). Remove dough from bread machine. Shape into a smooth round. Place dough in a lightly greased (use vegetable oil or butter) mixing bowl, cover with cling wrap or a damp cloth and let proof in room temperature (around 28 to 30 degC) for about one hour, or until double in bulk.

* Remove the dough from the bowl and give a few light kneading to press out the gas in the dough. Divide the dough into 10 equal portions (about 55g each). Roll each dough into smooth rounds and place on a greased (or lined with parchment paper) baking tray. Space doughs two inches apart to allow them to expand. Cover with damp cloth or cling wrap and leave doughs to proof for the second time for about 30~40mins, or until double in size.

* Pipe topping onto each dough. Make sure to cover the entire surface with the topping.

* Bake in pre-heated oven at 180 deg C for 15 mins or until golden brown. Remove from oven and transfer to wire track to let cool. Once cool, store immediately in an airtight container. Best served warm (re-heat in oven if necessary before serving).

Recipe source: 65度C汤种面包, 陈郁芬 and 我的幸福手作面包,李成实
Care for a slice of cake? Anyone?


It has been a long while since I baked something with lavender. I bought some dried lavender, on impulse, of course, and it has since been sitting in the cupboard for weeks. I am so glad that I finally used it to bake something!


It is certainly a good start as this Lavender Pound Cake came out of the oven with a slight dome, a nice albeit not too deep crack in the centre, and a beautiful, even, brown crust. The lovely golden crumbs has more than compensate the higher calories count.


The distinct scent of the lavender filled my kitchen as the cake was baking in the oven. Yet, I didn't find it too overpowering. The texture was not too dense although it wasn't as moist as I would have expected it to be. I could have over baked it since I had left it in the oven for extra few minutes just to make sure the cake was fully cooked. I like the nice buttery fragrance though, with just a hint of lavender lingering at the background. I am thankful that my family was quite receptive to the not too familiar taste of a scented cake. I will certainly try out other ways to use the reminding lavender, and hopefully I am able to come back with good results.


Lavender Pound Cake

Ingredients:
(makes one 17cmx7cmx6cm loaf cake)

90g cake flour
1 teaspoon baking powder
30g ground almond
100g caster sugar
100g unsalted butter, room temperature
2 large eggs, room temperature
1 teaspoon dried lavender
some apricot jam (I omitted this)

Method:
  1. Spread ground almond on a baking tray. Toast in oven at 100 degC for about 10mins. Give it a stir in between to ensure even toasting. Leave to cool completely.
  2. Line 17cm x 7cm x 6cm loaf pan with parchment paper (base and all sides). Set aside.
  3. Sieve cake flour, baking powder together, set aside.
  4. Beat butter and sugar with electric whisk until mixture turns light and fluffy.
  5. Add 1 egg yolk, beat well. Add 1 egg white in 3 separate additions (or dribble in gradually), beat well after each addition. Repeat the same with the second egg yolk followed by the egg white also in 3 separate additions, beat well after each addition (Note: this method of adding in the eggs helps prevent the batter from curdling.)
  6. Add the ground almond, fold with a spatula until just combined.
  7. Sieve over the flour mixture in 3 separate additions, each time fold with spatula until just combined.
  8. Add dried lavender, fold to combine.
  9. Spoon batter into prepared loaf pan. Bake in preheated oven at 170 degC for 10mins. Remove from oven. With a knife, make a slit lengthwise along the centre of the cake (this is to ensure the cake produce a nice crack upon baking). Continue to bake for another 30~35mins or until a skewer inserted into the centre comes out clean. Unmould, transfer to wire rack, leave to cool. Brush top with apricot jam if using.
Recipe source: adapted from Delicious!! Baked Cakes
I don't usually make layered cakes unless there is a special occasion.


I baked this simple chocolate layered cake for my child's birthday, and also to mark the 14th year since I became a mom ;) How time flies, our bundle of joy has now grown into a healthy teenager!


As what I have planned, we bought him a camera as birthday present. He was uneasy when I asked him which model he would prefer, he felt that he didn't deserve it at all. It is an expensive gift but I know he will make good use of it. Since he didn't want any birthday presents for the past few years, plus I do not reward him with gifts even for doing well in his studies, I thought this camera is a good way to make up for everything. To make him feel more comfortable,  I told him not to expect any birthday presents for the next ten years, this 'assurance' instantly puts him at ease ;)


Back to the layered cake. I got out of my comfort zone this time. Instead of using the whole eggs method to make a genoise sponge cake, I followed a chocolate chiffon cake recipe. This recipe came in handy as it calls for baking powder and baking soda, which was good for me as I needed that little extra help to make sure the cake would rise since I wanted to bake it in a normal cake tin instead of a chiffon tube pan. The cake did rise and formed a slight dome with a small crack on it. It didn't bother me much since I could removed the dome easily. After slicing the cake into three layers, I couldn't help but to take a picture of it. The cake looked lovely without any frosting, I know I am quite capable of messing up things when it comes to frosting and decorating a cake, it is not difficult to imagine how ugly it will end up.


The chocolate ganache was surprisingly easy to work with, much easier to smooth it evenly over the cake than whipping cream. Even without using a cake turntable the chocolate layer appeared to be quite smooth. Not too bad for a self taught baker.


As usual I was at a loss when it comes to decorating a cake. I lack creativity and imagination. Fortunately, my younger son was at home that afternoon. With his help, we managed to put something together...although it turned out to be a little too kiddish for a teenager, lol.  But, we know the birthday boy wouldn't mind...unlike his mom, he doesn't eat with his eyes.


We had a mini celebration that evening. The lovely reflections of the candle flames on the chocolate layer made this homemade cake looked so much more sophisticated. Actually, I totally forgot about getting a box of matchsticks to light the candles. Since the candles were very small, I didn't want to risk burning my fingers to light them directly over my gas stove. I have no matchsticks at home but I do have a packet of spaghetti. Yes, I used a piece of spaghetti as a lighter. It worked really well and I only used one piece to get the job done. If I were to use matchsticks, I would probably used up a whole box to light so many candles. Besides using it as a matchstick, do you know that spaghetti can also be used as cake tester? The only down side is, if you are not careful, it may break and you may end up with a broken piece of spaghetti inside your cake!


The texture of this cake was slightly heavier than a normal chiffon cake, it tasted just like the usual sponge cake to me. Nevertheless, I was quite satisfied with the result as it could get very tricky when making chiffon or sponge cake with cocoa powder. The chocolate ganache was really good, I used only a very small amount, yet, its presence was felt. Overall it was a delicious cake that everyone enjoyed.


Chocolate Layered Cake

Ingredients:
(make one 7" round cake)

for sponge layer:
3 egg yolks (use large eggs)
25g caster sugar
50ml vegetable oil
70ml water
1 teaspoon vanilla extract
85g cake flour
25g cocoa powder
1 1/2 teaspoons baking powder
1/3 teaspoon baking soda

4 egg whites (use large eggs)
55g caster sugar

for chocolate ganache:
170g pouring cream (I used one can Nestle pouring cream)
170g dark chocolate, coarsely chopped

Method:

   to make sponge cake:
  • Line base of a 7" round pan with parchment paper. Do not line or grease the sides.
  • Sieve together cake flour, cocoa powder, baking powder and baking soda. Set aside.
  • Place egg yolks in a mixing bowl. With a ballon whisk, whisk the yolks a little. Add in sugar and whisk till the mixture turns pale and thickens.
  • Add in vegetable oil gradually, whisking at the same time till the mixture combines.
  • Add in water gradually, whisking at the same time till the mixture combines. Add in vanilla extract, whisk to combine. Sieve over the flour mixture and whisk till the flour is fully incorporated. Do not over mix. Set aside.
  • In a clean, dry mixing bowl, beat egg whites with a handheld electric mixer on low speed until mixture becomes frothy and foamy. Add half of the sugar amount and turn to high speed and beat the mixture. Continue to add in the remaining sugar and beat until the egg whites reaches the soft peak stage.The soft peak stage is reached when the peaks of the whites curl over and droop slightly. The egg whites should appear smooth and glossy. (Do not over beat the whites still stiff, it is better to beat the whites still soft peaks for easy folding with the yolk batter.)
  • Add the beaten egg whites into the egg yolk batter in 3 separate additions, each time folding gently with a spatula until just blended.
  • Pour batter into the prepared pan. Tap the pan lightly on a table top to get rid of any trapped air bubbles in the batter. 
  • Bake in pre-heated oven at 170 degC for 40~45 mins, or until a toothpick inserted into the centre comes out clean, when lightly pressed the cake will spring back. Invert the pan immediately and let cool completely before unmould. To release the cake from the pan, run a thin-bladed knife or a off-set spatula around the inside of the pan.
   to make chocolate ganache:
  • Place cream and chopped chocolates in a bowl. Set it over a saucepan of simmering water (make sure the bowl is big enough to sit over the saucepan).
  • Stir the mixture gently with a spoon till the chocolate melts and mixture becomes smooth.
  • Remove from the bowl from the saucepan. Use immediately.
   to assemble:
  • Slice the cake horizontally into three layers. Place a layer of sponge cake on a cake board. Spoon about 4 heaped spoons of the chocolate ganache onto the surface. Spread evenly with a spatula. Repeat with the second layer of sponge cake. Place the third layer and spoon the remaining ganache over the top and spread it over to the sides. Smooth the surface evenly with the spatula. Decorate as desired. Keep chilled in fridge.
Recipe source: adapted from 初事身手做甜点, 信太康代
There is nothing special about this simple banana walnut cinnamon cake. This cake is as ordinary as your everyday white loaf bread. I can't find anything that I could shout out loud. There is absolutely no wow factor, be it the texture, the flavour...and it certainly doesn't look like a pretty cake. In fact, the method of preparing this cake is not very different from baking a batch of muffins. It is just like putting 12 muffins together to form a cake.


Yet, I couldn't help but to blog about it, and that is despite the colour of my photos came out weird, thanks to the poor lighting condition.


and here are my reasons for writing up this post:

This is the kind of cake that I will make anytime, as long as I have a bunch of over ripe bananas and leftover walnuts, or any nuts or dried fruits I could find in my fridge. Making the cake is a breeze, you do not have to invest much of your precious time just to put a cake into the oven. It is one of those cakes that you could bake on a whim...jumping from the couch to the kitchen ;) There is not much washing up either. Best of all, it is quite a fool-proof recipe...I doubt anything could go wrong, unless this is the very very first time you have ever baked a batch of muffins. Even then, by following the steps closely, I am sure any novice will be able to make a stir-and-bake cake like this one.

Despite its simplicity, the texture of the cake is really good....soft, moist and fluffy. Definitely a healthier choice than any store bought banana walnut cake as it doesn't leave a greasy after taste, or stick to the roof of your mouth...yet it doesn't taste dry at all. I wouldn't recommend omitting the cinnamon powder as it does lend a aromatic flavour to this ordinary, everyday tea cake.

On a side note, I can't remember where I read it, but I have learned something new about preparing a cake pan for baking. I have always line the base of the cake pan with parchment paper, but for the sides, sometimes I will line it with parchment paper, and sometimes (especially if the recipe specifically states so) I will grease, with butter, and flour the sides. It never occurs to me whether it makes any difference...since both methods help to prevent the cake from sticking to the pan. The only difference for me is, I always get very frustrated trying to line the sides or a round pan with parchment paper. I have this thing about making sure the paper sticks perfectly to the sides so that my cake will come out of the pan with a perfect 90 degree straight edges! Anyway, it may not be new to you, and it may even sound trivial, I learned that by greasing and flouring the sides, the finished cake will give a nice golden crust. Call me a perfectionist if you must, but I was really happy to notice the evenly browned crust all over the sides of this cake. In case you are wondering, no, the crust is not thick and hard at all, just a nice thin layer, which doesn't add much value to the cake, but does brighten up an ordinary home baker's day....

Thank you for reading :)


Banana Walnut Cinnamon Cake

Ingredients
(makes one 7" cake)

150g cake flour
2g ground cinnamon
4g baking powder
2g baking soda
1g salt (I used sea salt)
2 large eggs
80g caster sugar (I cut down to 70g)
70ml vegetable oil (I used canola oil)
1 1/2 teaspoons pure vanilla extract
250g, about 3 medium sized over ripe banana, mashed (original recipe uses 120g)
70g walnuts, coarsely chopped (reserve 1 tablespoon as toppings)


Method:
  • Toast chopped walnuts at 150degC for about 8 to 10mins, stir in between and make sure walnuts do not get burnt.
  • Line base of a 7" round pan with removable base with parchment paper, grease (with butter) and flour the sides. Set aside.
  • Sieve together cake flour, ground cinnamon, baking powder, baking soda and salt, set aside.
  • Place eggs, caster sugar, oil and vanilla extract in a mixing bowl. With a manual whisk, whisk to combine.
  • Add mashed banana, whisk to combine.
  • Sieve over the flour mixture, with a spatula, fold the mixture until just incorporated. Do not over mix. The batter should appear lumpy.
  • Add in chopped walnuts (set aside 1 tablespoon to use as toppings), stir just to combine.
  • Pour batter into prepared pan. Tap the pan a few times on work surface to release any trapped air bubbles. Sprinkle the top with the remaining walnuts.
  • Bake in pre-heated oven at 175degC for 30-35mins or until a tooth pick inserted into the centre comes out clean.
  • Remove from oven, leave to cool for 5mins. Unmould and transfer to wire rack, let cool completely.
Recipe source: adapted from 我的幸福手作面包,李成实